.jpg)
.jpg)
.jpg)
All the Fritzing Circuits are made by
Divyansh Bansal
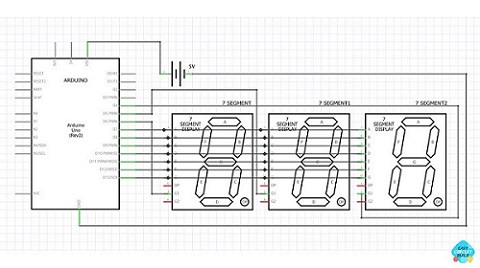
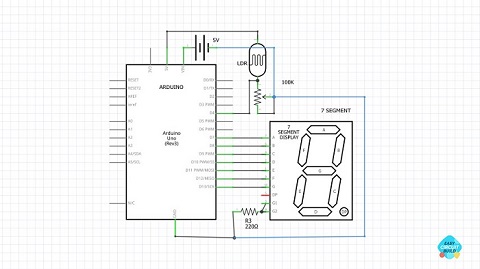
7 Segment Voltmeter using Arduino
In this circuit, we are multiplexing 3:7 segment display and by the use of a potential divider, the analog signal is generated which is decoded by Arduino and is displayed on 7 segment display. The voltage input for this voltmeter is 0-50 volt DC.
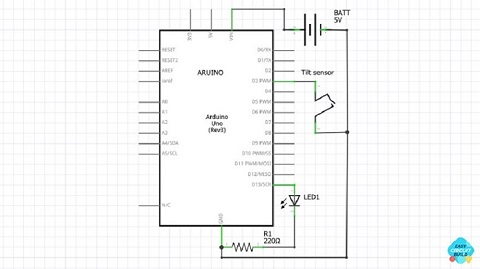
Tilt Sensor using Arduino
This circuit demonstrates the working of the tilt sensor using Arduino, we can use the outputs of the tilt sensor in the serial monitor of Arduino IDE or by adding some external display source such as LEDs, LCD display, 7 Segment display, OLED, TFT, etc.
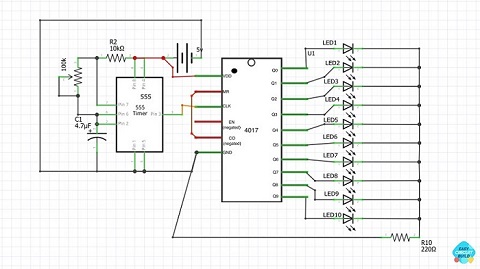
555 Timer - Chaser Circuit
Here we are using a NE555 Timer IC circuit with variable flashing speed to provide a clock to the shifter IC (CD4017) for output we have attached an LED on each output pin of the shifter IC, to represent the working of the LED chaser circuit.
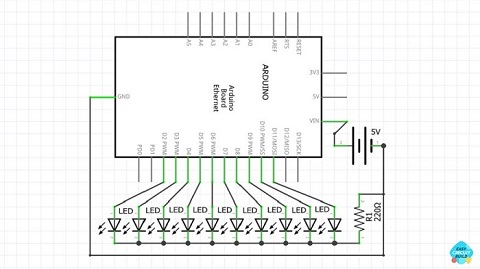
Chaser using Arduino
It is a simple circuit of LED chaser using the developent board (Arduino), in this, we have defined all the respective pins on which we want the output, in the code of Arduino we have defined working and delay time for running the LED chaser.

Dark Active using NE555
This circuit has multiple applications such as automatic street light, staircase light, dark activation, etc. In this circuit, we can adjust the time duration for a load. As the LDR sense, the variation in the light intensity circuit gets activated.
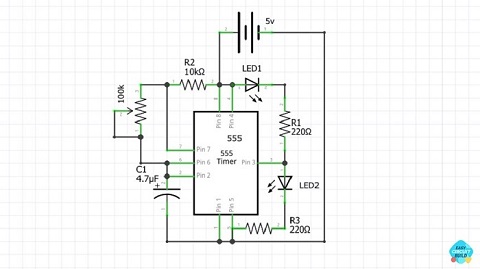
Double Flasher Circuit
This is a normal double flasher circuit used in emergency vehicles, flip-flops, basic traffic lights and for decorative purposes, the circuit is made around NE555 timer IC. In this, we can adjust delay using a capacitor and the ratio of resistors.
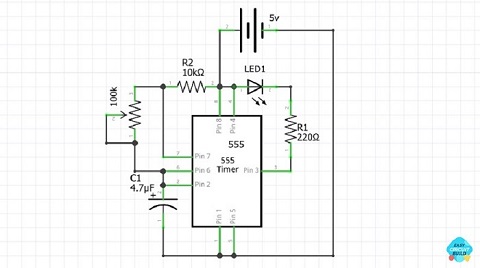
Flasher Circuit
This is the most popular flasher circuit using NE555 timer IC. In this circuit we hardly require some basic components such as a Capacitor for delay time, resistor to adjust the delay and for output representation, an LED is attached to the output.
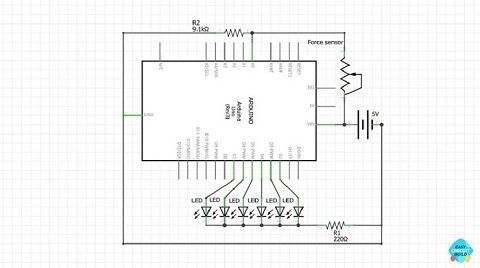
Force Sensor Circuit
In this circuit as per the name, we are using a force sensor. LEDs are placed on their respective pins to represent the amount of force applied to the force sensor. Here we are using Arduino for manipulating and converting analog signal to binary.
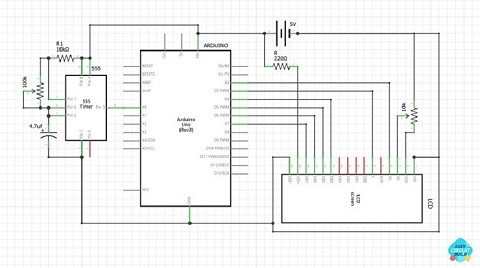
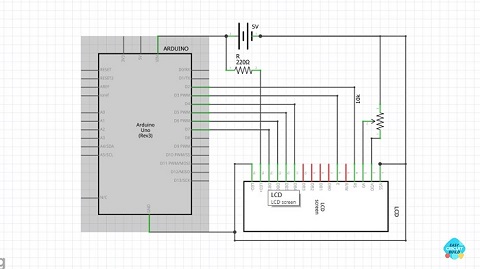
Frequency Counter Circuit
In this circuit, for demonstration, we are using a 555 timer IC circuit as a frequency generator sending input signals to Arduino. Arduino is displaying the value of frequency on 16 X 2 LCD display at 4 bits. We can also use I2C communication.
LCD Display using Arduino
It is a demonstration circuit of 16 X 2 LCD display. In this, we have designed a circuit on the 4-bit option which is more compatible with Arduino, ATmega chipsets. we can use multiplexer, I2C communication. In code, we can define what we want to print.
LDR Counter using Arduino
In this circuit we send an analog signal by making a potential divider that is displayed on 7 segment display using multiplexing, Whenever there is a change in light intensity the count number gets increased, after every 9 no. count the counter gets reset.
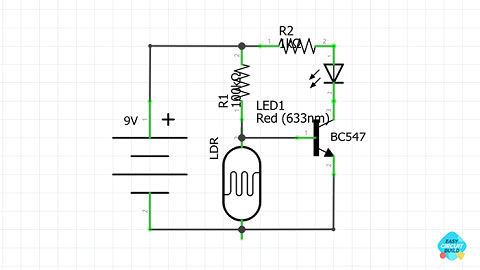
LDR Circuit
This is one of the easiest, most common, and cheapest circuit with minimal requirements that is LDR, transistor, and a LED. We can make both Daylight and Nightlight detection systems using this basic circuit.
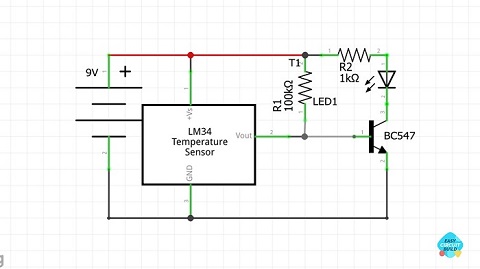
Temperature Sensor using LM35
In this circuit, we are using a BC547 NPN transistor. The Temperature sensor receives temperature input which varies as per the temperature around the LM35 sensor, the sensor then gives the output which triggers the transistor, hence activates the load.

Moisture Sensor
In this circuit, we are using a BC547 NPN transistor. The moisture sensor work as a variable resistance whose resistance varies with moisture present near the sensor, the variation of resistance of the moisture sensor triggers the transistor to activate load.
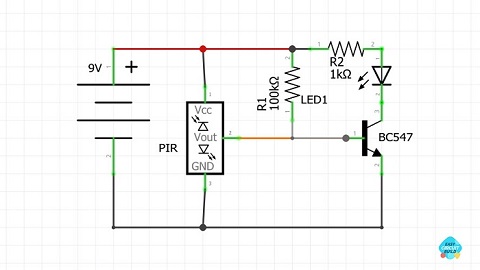
PIR Sensor
In this circuit, we are using a BC547 NPN transistor. The PIR sensor sends millivolt impulses which vary as per the distance from the PIR sensor, the impulses from the PIR sensor trigger the transistor and hence activates the load.
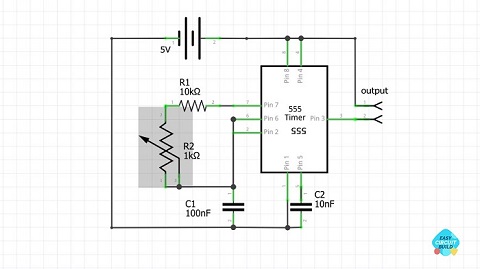
Square Wave Generator
The square wave generator is commonly used in low-cost UPS/Inverters circuits. We use NE555 timer IC as a base IC which features flipflop functions, that generates square wave impulses. The frequency can be tuned by the rating of components.
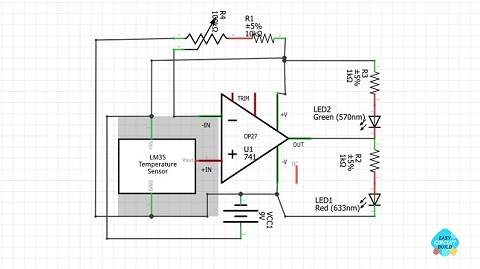
Temperature Sensor Opamp
This is a temperature sensor circuit using LM35 (temperature sensor) and LM741 (Opamp). The temperature sensor triggers the opamp as per the temperature sensed from the environment and activated the LED.
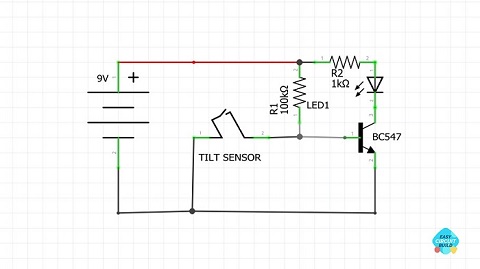
Tilt Sensor
In this circuit, we are using a BC547 NPN transistor. The Tilt sensor work as a variable resistance whose resistance varies with Tilt providied to the sensor, the variation of resistance of the tilt sensor triggers the transistor to activate the output load.